Info kplace.plala.jpから移設しました
vsftpd over TLS/SSL
作成日: 2015/04/18■目的
自宅設置のFTPサーバの転送を暗号化します。
使用するのはvsftpd over TLS/SSLです。
■環境
OS :CentOS 6.6
ftp :vsftp 2.2.2 + ftps
■構成ファイル
/etc/vsftpd/vsftpd.conf構成ファイルのサンプルです。
anonymous_enable=NO
:匿名ログイン禁止
local_enable=YES ;ローカルユーザログインOK
write_enable=YES
local_umask=022
dirmessage_enable=YES
xferlog_enable=YES
connect_from_port_20=YES
xferlog_std_format=YES
chroot_local_user=YES ;chroot有効
chroot_list_enable=YES ;chroot有効
chroot_list_file=/etc/vsftpd/chroot_list ;chroot list file指定
ls_recurse_enable=YES ;directory一括転送
listen=YES
pam_service_name=vsftpd
userlist_enable=YES
tcp_wrappers=YES
rsa_cert_file=/etc/pki/tls/certs/vsftpd.pem ;暗号キーファイル指定
ssl_enable=YES ;ssl有効
ssl_ciphers=HIGH ;暗号化レベル
force_local_data_ssl=NO ;データ暗号化
force_local_logins_ssl=YES ;ログイン暗号化
allow_anon_ssl=YES
ssl_tlsv1=YES
ssl_sslv2=NO
ssl_sslv3=NO
require_ssl_reuse=NO ;NextFTP対応
pasv_address=192.168.170.131 ;passive modeサーバ
pasv_enable=YES ;passive mode有効
pasv_min_port=50021 ;passive port# min
pasv_max_port=50040 ;passive port# max
■Chrootユーザ指定local_enable=YES ;ローカルユーザログインOK
write_enable=YES
local_umask=022
dirmessage_enable=YES
xferlog_enable=YES
connect_from_port_20=YES
xferlog_std_format=YES
chroot_local_user=YES ;chroot有効
chroot_list_enable=YES ;chroot有効
chroot_list_file=/etc/vsftpd/chroot_list ;chroot list file指定
ls_recurse_enable=YES ;directory一括転送
listen=YES
pam_service_name=vsftpd
userlist_enable=YES
tcp_wrappers=YES
rsa_cert_file=/etc/pki/tls/certs/vsftpd.pem ;暗号キーファイル指定
ssl_enable=YES ;ssl有効
ssl_ciphers=HIGH ;暗号化レベル
force_local_data_ssl=NO ;データ暗号化
force_local_logins_ssl=YES ;ログイン暗号化
allow_anon_ssl=YES
ssl_tlsv1=YES
ssl_sslv2=NO
ssl_sslv3=NO
require_ssl_reuse=NO ;NextFTP対応
pasv_address=192.168.170.131 ;passive modeサーバ
pasv_enable=YES ;passive mode有効
pasv_min_port=50021 ;passive port# min
pasv_max_port=50040 ;passive port# max
/etc/vsftpd/chroot_listでホームページより上のディレクトリへのアクセス可能なユーザIDを登録します。
# vi
/etc/vsftpd/chroot_list
■証明書自前の暗号化キー用証明書を/etc/pki/tls/certs/vsftpd.pem に準備します。
# cd /etc/pki/tls/certs
# openssl req -x509 -nodes -newkey rsa:1024 -keyout /etc/pki/tls/certs/vsftpd.pem -out /etc/pki/tls/certs/vsftpd.pem -days 365
Generating a 1024 bit RSA private key
......++++++
.......++++++
writing new private key to '/etc/pki/tls/certs/vsftpd.pem'
-----
You are about to be asked to enter information that will be incorporated
into your certificate request.
What you are about to enter is what is called a Distinguished Name or a DN.
There are quite a few fields but you can leave some blank
For some fields there will be a default value,
If you enter '.', the field will be left blank.
-----
Country Name (2 letter code) [AU]:JP # 国
State or Province Name (full name) [Some-State]:Kanagawa # 地域(県)
Locality Name (eg, city) []:Hakone # 都市
Organization Name (eg, company) [Internet Widgits Pty Ltd]:IC # 組織名
Organizational Unit Name (eg, section) []:IC # 組織の部門名
Common Name (eg, YOUR name) []:centos01 # サーバーのFQDN
Email Address []:xxx@gmail.com # 管理者アドレス
# chmod 600 vsftpd.pem
■デーモンの再起動# openssl req -x509 -nodes -newkey rsa:1024 -keyout /etc/pki/tls/certs/vsftpd.pem -out /etc/pki/tls/certs/vsftpd.pem -days 365
Generating a 1024 bit RSA private key
......++++++
.......++++++
writing new private key to '/etc/pki/tls/certs/vsftpd.pem'
-----
You are about to be asked to enter information that will be incorporated
into your certificate request.
What you are about to enter is what is called a Distinguished Name or a DN.
There are quite a few fields but you can leave some blank
For some fields there will be a default value,
If you enter '.', the field will be left blank.
-----
Country Name (2 letter code) [AU]:JP # 国
State or Province Name (full name) [Some-State]:Kanagawa # 地域(県)
Locality Name (eg, city) []:Hakone # 都市
Organization Name (eg, company) [Internet Widgits Pty Ltd]:IC # 組織名
Organizational Unit Name (eg, section) []:IC # 組織の部門名
Common Name (eg, YOUR name) []:centos01 # サーバーのFQDN
Email Address []:xxx@gmail.com # 管理者アドレス
# chmod 600 vsftpd.pem
構成ファイル変更時のvsftpd再起動と、自動起動を行います。
# service vsftpd
restart
# chkconfig vsftpd on
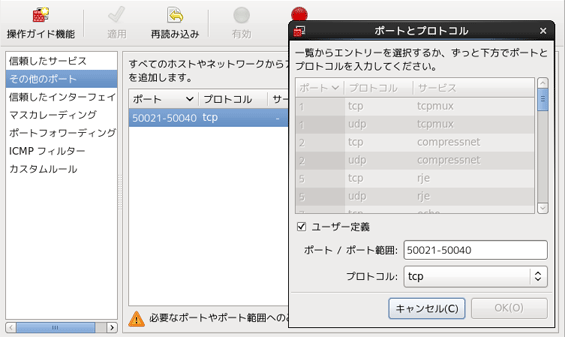
■Firewall# chkconfig vsftpd on
SELINUXを無効化します。
Firewallでftp(tcp/21)ポートとpassive modeポートをオンにします。
以下はpassive modeポート解放のサンプルです。
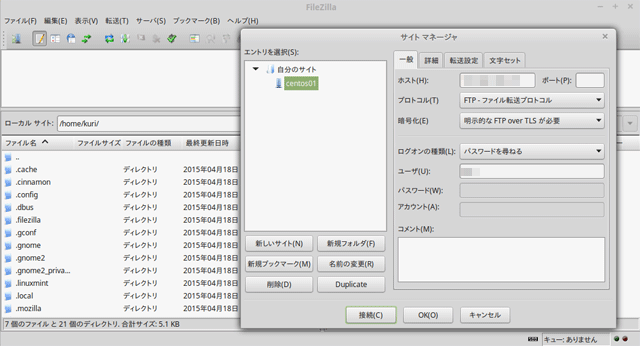
■Filezilla
Filezillaでの暗号化転送の手順です。
[ファイル][サイトマネージャ]を開いてftpサーバを指定します。
[プロトコル=ftp][暗号化=明示的なFTP over TLSが必要][ログオンの種類=パスワードを尋ねる][ユーザ=xxxx]
[接続]で証明書が表示されます。
[証明書]
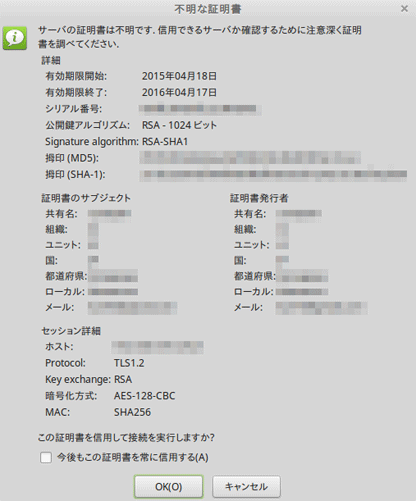
作成時入力と同じ内容なら[OK]でFTPサーバに接続されます。
■そのた
今回以下の変更も行います。
(1)TCP Wrapper
プライベートネットワークからの限定アクセスを解除
/etc/hosts.allow
/etc/hosts.deny
(2)Broard Band Router
NAT/ftpアクセス許可
Passiveポート解放
■結果
FTP転送の暗号化を完了しました。
上記設定でアクティブ/パッシブモードとも転送可能になりました。
プライベートネットワーク限定のアクセス範囲は、暗号化で外出先まで拡張します。